Adventure #1 – Teensy-LC USB Gamepads
I have been experimenting with using Teensy-LC as USB gamepads as part of my Laser Defender Arcade machine. I found some articles with half examples, non functioning examples and many forums with people in the same situation as me, limited knowledge and a pile of errors.
Not being a software developer by trade, it has been an interesting journey recently into Unity with C# (courtesy of Ben Tristem, for giving me access to his course) and further delving into microcontrollers, this time the Teensy-LC.
I have found 2 solutions that I will document here.
1) MSF Fight Stick (XINPUT)
This actually works as documented: https://github.com/zlittell/MSF-FightStick. I copied the files into an arduino 1.8.6 directory and it compiled and uploaded.
The only gotchas I had were:
– Needed at least Arudino 1.8.6
– There was no rumble example
– XINPUT is limited to 4 devices of type xbox controller
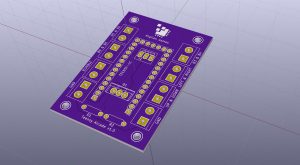
I have made a custom PCB to cope with 6 buttons, DPAD and Rumble Motor. I will make another post about my adventures in Kicad. Which I will link here: TBC
MSF Fight Stick is a very nice way to make a custom controller for XINPUT games. I am using XINPUT on Unity as I dislike the Unity Input system, as did a Canadian dude called Kenton, who instead made is own custom HID-based device also using the teensy.
2) Custom HID-based Controller
Kenton modified the usb libraries to make a generic DINPUT controller using a custom USB device type, as documented: https://blog.hamaluik.ca/posts/making-a-custom-teensy3-hid-joystick
In 2018, this has MANY gotchas, as it would not compile AT ALL, it threw error after error at me, and I *think* this is what I had to fix (all in avr/cores/teensy3):
– I started with a new (unspoilt) copy of the Arduino IDE 1.8.7
– I performed all the source modifications listed by Kenton on his blog but for the boards.txt it is different (see embigged).
teensyLC.menu.usb.arcade=Your Gamestick Name Here
teensyLC.menu.usb.arcade.build.usbtype=USB_ARCADE
teensyLC.menu.usb.arcade.fake_serial=teensy_gateway
The difference in the removal of “.name” took me 5 hours to find :'(
– I modified yield.cpp, as serial was not included it complains
#if defined(USB_SERIAL)
if (Serial.available()) serialEvent();
if (Serial1.available()) serialEvent1();
if (Serial2.available()) serialEvent2();
if (Serial3.available()) serialEvent3();
#ifdef HAS_KINETISK_UART3
if (Serial4.available()) serialEvent4();
#endif
#ifdef HAS_KINETISK_UART4
if (Serial5.available()) serialEvent5();
#endif
#if defined(HAS_KINETISK_UART5) || defined (HAS_KINETISK_LPUART0)
if (Serial6.available()) serialEvent6();
#endif
#endif
– Commented out like 651 in usb_desc.c (2017) as it conflicted
//#define CONFIG_DESC_SIZE MULTITOUCH_INTERFACE_DESC_POS+MULTITOUCH_INTERFACE_DESC_SIZE
Success
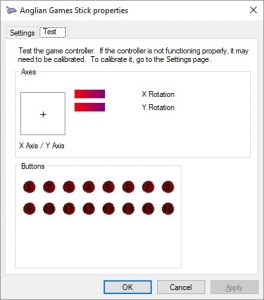
Now I have a device like this, with my own device name !
Make it analog
As a bonus, I made this extra function in usb_arcade.h to make the axis analog. Deadzone configuration option and full example coming soon.
void analog(uint8_t axis, uint16_t val) {
if(axis >= 4) return;
usb_arcade_data[axis] = map(val,0,1023,-127,127);
if(auto_send) usb_arcade_send();
}
Full Analog Stick example
const int BUTTON_1 = 1;
const int BUTTON_2 = 2;
const int BUTTON_3 = 3;
const int BUTTON_4 = 4;
const int BUTTON_5 = 5;
const int BUTTON_6 = 6;
const int BUTTON_7 = 7;
const int BUTTON_8 = 8;
const int BUTTON_9 = 9;
const int BUTTON_10 = 10;
const int BUTTON_11 = 11;
const int BUTTON_12 = 12;
const int ledPin = 13;
const int BUTTON_13 = 14;
const int BUTTON_14 = 15;
const int BUTTON_15 = 16;
const int BUTTON_16 = 17;

const int AXIS_X = A6;
const int AXIS_Y = A7;
const int AXIS_RX = A8;
const int AXIS_RY = A9;

boolean ledOn = false;
unsigned long lastTime = 0;

void setup()
{
pinMode(ledPin, OUTPUT);

pinMode(BUTTON_1, INPUT_PULLUP);
pinMode(BUTTON_2, INPUT_PULLUP);
pinMode(BUTTON_3, INPUT_PULLUP);
pinMode(BUTTON_4, INPUT_PULLUP);
pinMode(BUTTON_5, INPUT_PULLUP);
pinMode(BUTTON_6, INPUT_PULLUP);
pinMode(BUTTON_7, INPUT_PULLUP);
pinMode(BUTTON_8, INPUT_PULLUP);
pinMode(BUTTON_9, INPUT_PULLUP);
pinMode(BUTTON_10, INPUT_PULLUP);
pinMode(BUTTON_11, INPUT_PULLUP);
pinMode(BUTTON_12, INPUT_PULLUP);
pinMode(BUTTON_13, INPUT_PULLUP);
pinMode(BUTTON_14, INPUT_PULLUP);
pinMode(BUTTON_15, INPUT_PULLUP);
pinMode(BUTTON_16, INPUT_PULLUP);
pinMode(AXIS_X, INPUT);
pinMode(AXIS_Y, INPUT);
pinMode(AXIS_RX, INPUT);
pinMode(AXIS_RY, INPUT);

// read the entire joystick at once instead of per event
Arcade.setAutoSend(false);

lastTime = millis();
}

void loop()
{
unsigned long time = millis();
// run at 50 Hz
if(time - lastTime >= 20)
{
lastTime = time;

// read the data of all our buttons
// our buttons
Arcade.button(1, 1 - digitalRead(BUTTON_1));
Arcade.button(2, 1 - digitalRead(BUTTON_2));
Arcade.button(3, 1 - digitalRead(BUTTON_3));
Arcade.button(4, 1 - digitalRead(BUTTON_4));
Arcade.button(5, 1 - digitalRead(BUTTON_5));
Arcade.button(6, 1 - digitalRead(BUTTON_6));
Arcade.button(7, 1 - digitalRead(BUTTON_7));
Arcade.button(8, 1 - digitalRead(BUTTON_8));
Arcade.button(9, 1 - digitalRead(BUTTON_9));
Arcade.button(10, 1 - digitalRead(BUTTON_10));
Arcade.button(11, 1 - digitalRead(BUTTON_11));
Arcade.button(12, 1 - digitalRead(BUTTON_12));
Arcade.button(13, 1 - digitalRead(BUTTON_13));
Arcade.button(14, 1 - digitalRead(BUTTON_14));
Arcade.button(15, 1 - digitalRead(BUTTON_15));
Arcade.button(16, 1 - digitalRead(BUTTON_16));

Arcade.axis(0, analogRead(AXIS_X));
Arcade.axis(1, analogRead(AXIS_Y));
Arcade.axis(2, analogRead(AXIS_RX));
Arcade.axis(3, analogRead(AXIS_RY));

// send a packet now
Arcade.send();

// toggle our led
ledOn = !ledOn;
digitalWrite(ledPin, ledOn);
}
}
Next Steps
The next steps in USB controller development is to create my own custom HID descriptor that contains only the buttons, axes and hats I (want) need. This will come after learning much more about the lower layers of USB and setting myself up with some tools to monitor the bus. I will also get some analog devices (compass, accelerometer, potentiometer, temperature sensor, theremin?) to make some interesting input devices for my Unity games.
I hope you found this helpful.


