
courtesy of Linux Voice under Creative Commons Licence CC-BY-SA
Love having your data in the cloud? Scared that the NSA and GHQC are tapping it all? Then it’s time to set up your own server!
We’re not big fans of buzzwords at Linux Voice. We don’t leverage synergies, we don’t harness data silos, and we most certainly don’t streamline our paradigms. At first, the term “cloud computing” came under this umbrella of linguistic silliness, because it basically meant “doing stuff on someone else’s computers”, like many people have already been doing for years. But over time the term has become widely accepted, so we’ll grudgingly use it. Bah humbug!
Now, there are many providers of cloud-like services on the net. DropBox, for instance, provides data storage and file sharing, while Google’s ever-growing range of services includes document collaboration (Google Drive) and calendars. Many of these third-party services are packed with features and are easy to use, but they all have one problem in common: they all have access to your data. If your files consist of nothing more than lolcat pictures, and your calendar is simply used to plan your pub visits, you’re probably not concerned about this. But if you’re storing sensitive information – such as business plans – then it’s wise to be cautious, especially in the wake of the Snowden revelations and US constitution-burning, NSA-spying shenanigans.
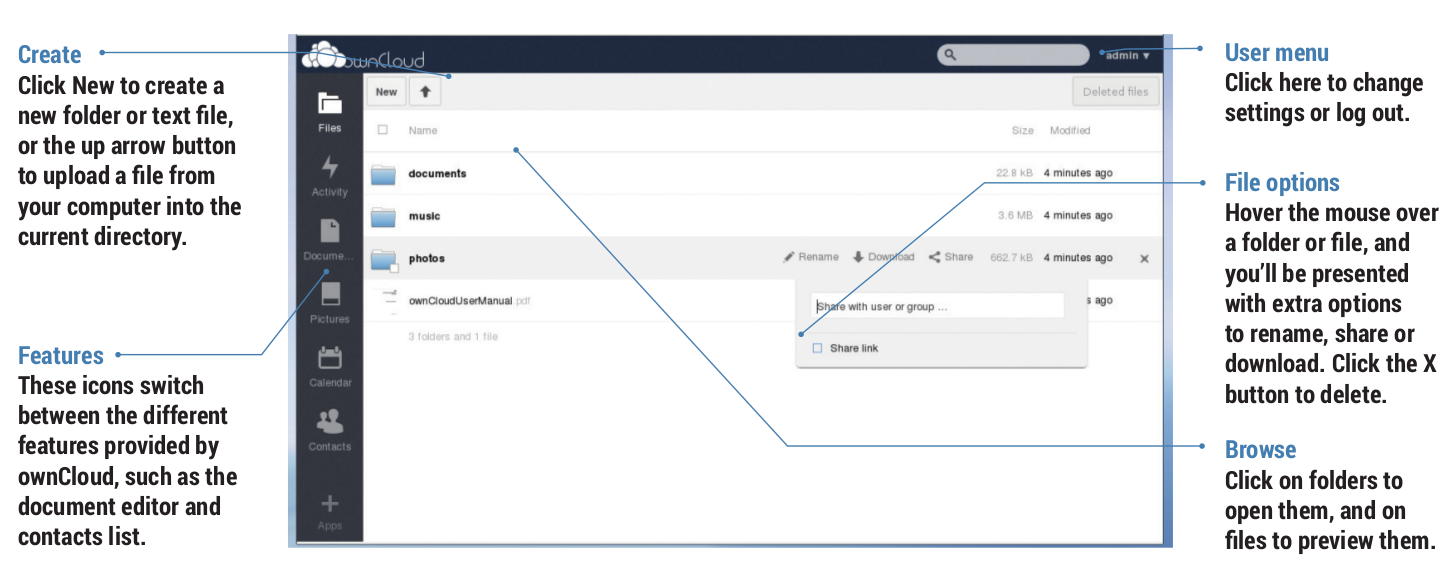
The ownCloud user interface (click for larger)
Do it yourself
One way around this is to host your own cloud services. It sounds like a contradiction in terms: isn’t the point of “cloud computing” that you offload all the work to someone else? Well, yes, but by hosting your own cloud you can still have some of the benefits, such as sharing data and providing collaboration services across multiple machines and users. You control the hardware and software, and determine who accesses your data, but you still have the convenience of cloud-like facilities.
Arguably the best open source cloud package at the moment is ownCloud, which reached version 6 in December. It’s loaded with useful features for file storage, file sharing, calendars and document collaboration, all accessible through a web browser, so here we’ll show you how to set it up and explore the goodies contained therein.
ownCloud on a Raspberry Pi
Yes, it’s possible. And no, the performance isn’t great. If you’ve overclocked your Pi, you’re using SQLite and you’ve set up the Cron job as described in the main text, your ownCloud installation will be fine for light usage, but you’ll have to accept some sluggishness here and there. Of course, there are advantages to installing on a Pi: you end up with a silent, tiny and very power-efficient ownCloud server that you can plug into your network somewhere and then forget about.
Because current versions of Rasbian are based on Debian 7.x, you will be able to follow this tutorial without major alterations. One thing you may want to change, however, is the location of the ownCloud data directory. If you’ll be using ownCloud for storing large files, it’s better to move this directory off the SD card and onto an external drive. You can do this in the initial part of ownCloud configuration: when you access the web interface for the first time to create an administrator username and password, click Advanced underneath and you’ll be able to assign the data directory to a different location. Just make sure that it’s writable by Apache.
Get it installed
You can install ownCloud on wide range of distros, and if you’re just playing around to learn the software, it doesn’t matter if you’re using a rapidly changing, cutting-edge distro – Arch Linux, for example. If you’re planning to use ownCloud for real work, however, we recommend using a highly stable and long-term supported distro such as Debian or CentOS – we’ll be using Debian 7.3 in this tutorial.
OwnCloud is written in PHP and can use a variety of web servers and databases. For simplicity’s sake, we’ll be using the well-known Apache web server here, along with SQLite to store metadata for the files. This is perfectly fine for a typical setup; if you end up really hammering your ownCloud server, though, you may want to switch to a more lightweight web server (such as Nginx) and a full-on database such as MySQL for extra performance.
To get the dependencies on Debian 7.3, use the following command:
apt-get install apache2 php5 libapache2-mod-php5 php5-sqlite php5-common php5-gd php-xml-parser php5-intl php5-mcrypt php5-curl ntp curl php5-imagick php-apc
Along with Apache, PHP and SQLite, this also adds some extras for generating thumbnail images of files and speeding up PHP scripts. Once these packages are installed, Apache should be started automatically – you can check that Apache is running by accessing the IP address of the Apache server in your browser (or going to http://127.0.0.1 if you’ve installed it on your local machine).

The document editor isn’t as powerful as some proprietary options, but it had enough for basic editing and supports collaboration.
Tarball time
Next, grab the .tar.bz2 file of the latest ownCloud release from www.owncloud.org. At the time of writing, this was owncloud-6.0.0a.tar.bz2, but by the time you read this a newer version may be available. If so, just replace the version number accordingly in the command below. Extract the archive into your web server’s document directory, eg:
cd /var/www/tar xfv /path/to/owncloud-6.0.0a.tar.bz2
A bare installation takes up 155MB. We’re almost ready to start using ownCloud now, but beforehand we have to make a few tweaks. First, we need to create a “data” directory inside the ownCloud installation, and make it (along with the “apps” and “config” directories and the .htaccess file) writeable by the web server, which uses the “www-data” account in Debian:
mkdir owncloud/datacd owncloudchown -R www-data:www-data data apps config .htaccess
Note that some other distros use different user accounts to “www-data” for Apache, such as “http” or “apache”. To find this out, run ps aux and look for the apache2/httpd processes, and then the username in the first column from the output.
Now we need to add some extra options to the Apache configuration file, which in Debian is
/etc/apache2/apache2.conf. If you’re using Apache 2.2 (the default in Debian 7.3) then add this to the bottom of the file:
</var/www/owncloud>Options Indexes FollowSymLinks MultiViewsAllowOverride AllOrder allow,denyallow from all</Directory>
If you’ve installed ownCloud in a different directory, change the path in the first line. And for Apache 2.4 systems, you’ll need to change the “allow from all” line to read “Require all granted” instead. Once you’ve made the changes, enable URL rewriting and restart Apache with the following commands:
a2enmod rewrite
service apache2 restart
(For distros using systemd, try systemctl restart httpd.service to restart Apache.)
That’s it – all the command line preparation is
done now. Access the server in your web browser
(eg http://127.0.0.1/owncloud/ if it’s installed on your local machine) and you should see the ownCloud login screen.
What’s new in ownCloud 6?
If you’ve been running ownCloud for a while, and you’re still using version 5, it’s well worth upgrading to the latest release. Major new features include:
- ownCloud Documents Edit rich text documents with other users. It’s not as featureful as Google Drive just yet, but it’s a major boost for ownCloud and takes it way beyond just storage and calendars. The back end uses ODF, the same file format used by Open/LibreOffice, so you can easily export your documents for local editing.
- User avatars User accounts can now be accompanied by pictures. While this isn’t a massive productivity boost, seeing images and not just names makes the interface nicer to work with.
- Activities A new view shows you recent activity in your account, such as changes to files.
- Better conflict handling Previous ownCloud releases were a bit rubbish if you tried to upload a file that already existed, but you can now choose to replace or rename a file when you’re uploading.
Set it up
The first thing you’ll need to do is create an admin username and password. ownCloud will do some background work, setting up its database, and you’ll be dropped into the main screen. A pop-up will point you to a selection of desktop and mobile apps you can use to access your ownCloud installation. If you have a smartphone, it’s worth trying these out.
A good way to understand the relationship between the different features is to click on the “photos” directory and then the up arrow, and upload a random image from your collection. If you now go click the Pictures icon on the left, you’ll see your newly uploaded image, albeit presented in a much more attractive manner than in the normal file manager.While you’re here, click on Activity on the left and you’ll see a list of changes to your files. If you go back into the Files view and delete your image (via the X button), you’ll see a “Deleted files” button appear in the top-right, from which you can restore files to their original locations.

Owncloud will let you know when a new version comes out and you need to upgrade.
Performance tuning
Periodically, ownCloud needs to execute some background jobs to manage its database and keep things running smoothly. By default this background job is run every time you load a page in ownCloud, but this impacts performance – it’s much better to do it via a Cron job. In Debian, run crontab -u www-data -e as root, and then add this line to the bottom of the file:
*/15 * * * * php -f /var/www/owncloud/cron.php
This runs ownCloud’s cron.php script every 15 minutes. If your distro runs Apache under a different username, change it in the crontab command, and alter the path for owncloud/cron.php if you installed it in a different directory. Back in the ownCloud web interface, click the admin username (top-right), Admin, and scroll down to the Cron section. Make sure the Cron option is ticked (instead of AJAX or Webcron).
By default, ownCloud’s upload limit is set to 513MB (and potentially made even smaller by PHP’s settings), which isn’t very useful if you plan to use it for backups and video files. To fix this, go to the “File handling” section of the Admin page in ownCloud, and update the number to something more flexible (eg 8GB). You’ll also need to change PHP’s settings as well – so edit /etc/php5/apache2/php.ini, changing these lines:
upload_max_filesizepost_max_sizeoutput_buffering
For the first two, set them to “8G”, and for the last one use “8192”. Restart Apache (as described earlier) and you’ll be able to upload much larger files.
How to enable secure (SSL) connections
If you plan to access your ownCloud installation from the outside world, you’ll want to enable SSL connections to encrypt your data as it travels across the internet. Here’s how.
First, make sure that you have OpenSSL installed (apt-get install openssl) and enabled in Apache (a2enmod ssl). Then create a self-signed SSL certificate as follows:
mkdir /etc/apache2/sslopenssl req -new -x509 -days 365 -nodes -out /etc/apache2/ssl/owncloud.pem -keyout /etc/apache2/ssl/owncloud.key
Now create /etc/apache2/conf.d/owncloud.conf with the following contents:
<VirtualHost 127.0.0.1:443>SSLEngine onSSLCertificateFile /etc/apache2/ssl/owncloud.pemSSLCertificateKeyFile /etc/apache2/ssl/owncloud.keyDocumentRoot /var/www<Directory owncloud>AllowOverride Allorder allow,denyAllow from all</Directory></VirtualHost>
If you’re not testing ownCloud on your local machine, replace 127.0.0.1 in the first line with the IP address of the ownCloud server (you can discover this by running the ifconfig command on the server). And, of course, change the paths to the ownCloud installation where necessary. Restart Apache and access ownCloud via HTTPS, eg https://127.0.0.1/owncloud/.
Explore it
It’s not a good idea to use the administrator account for day-to-day work, so click on the Admin button in the top-right and then Users from the menu. Here you can type in a login name and password, and click the Create button to add the user to the database. If needed, you can also limit the amount of storage space allocated to the account.
So, click Admin > Log Out, and then log in with your normal user account. You’re now ready to start exploring ownCloud’s features in depth. You already have a bit of experience with the Files view: it acts as a simple file manager, and is a good way to organise your files so that you can access them from any machine on your network via a web browser.
But wouldn’t it be better if you could access ownCloud data in a proper desktop file manager? Well, that’s possible thanks to ownCloud’s WebDAV support. In Gnome 3’s Nautilus file manager, click Files > Connect To Server and enter the following:
dav://127.0.0.1/owncloud/remote.php/webdav
Replace the IP address if necessary, and if you’ve enabled SSL support (as per the boxout), change “dav” to “davs” here. Xfce users can browse ownCloud shares in Thunar by clicking Go > Open Location and using the above address, while in KDE’s Dolphin, click in the address area and enter:
webdav://127.0.0.1/owncloud/remote.php/webdav
After logging in with your ownCloud username and password, you’ll be able to browse your files and upload new ones by dropping them into the window.
To share files with the outside world, hover over a file and click the Share button. You can either share the item with another user on the ownCloud installation, or generate a link (optionally password protected) to give to anyone on the internet.
OwnCloud’s calendar is simple, but useful: you can switch between day, week and month views, and click on an empty space to add an event. It’s possible to set these events as all-dayers and make them repeat across multiple days. Under the Advanced button you’ll find options for adding extra information such as a location, category and description.
If one calendar doesn’t suffice for your work, click the cog (settings) icon in the top-right, just beneath your username. Here you can add extra calendars and also customise your time zone and time format. As with the Files view, you can also access your calendar from external apps: in the same settings panel, scroll down to the bottom where you’ll see a URLs section. This provides you with CalDAV addresses that you can use with CalDAV-compatible apps such as Kontact and Evolution. Many mobile apps also support CalDAV, so you can keep your ownCloud calendar up to date when you’re on the road.
In the Contacts view you can add entries and group them together. The cog button here also provides some useful features – for instance, a CardDAV URL that you can input into external contact management apps (click the globe icon). It’s also possible to export your contacts list in .vcf format.
Documents
And here we come to the final big feature of ownCloud: document collaboration. This was introduced in version 6 (see the boxout, left), and while it’s not especially useful for complicated documents at the moment, it does a decent job for basic rich-text editing jobs. When you click the Documents view, you’ll see that a sample has already been provided for playing around with – example.odt.
Click on it and you’ll see a minimalist word processor-esque interface, letting you add basic formatting to the text. But the most interesting part of this is the collaboration: start editing the text, and you’ll see a coloured bar appear on the left-hand side, next to the paragraph that you modified. You’ll notice that the colour of the bar matches the outline for your user icon on the right.
Click on Share in the top-left, and enter the name of another user (or the administrator, if you’ve only created one user account). Then, in a different web browser (so that you can have multiple sessions going), log into your ownCloud installation as that other user and go to the Documents view. You can now edit the document in both browser windows, seeing the changes that each user makes.
OwnCloud Documents is still in its infancy, but it already provides a great escape from Google Drive for many jobs, and it will just keep on getting better and better. If you love Google Drive’s convenience but hate the thought of being spied on, why not give it a go?